Category: hardware

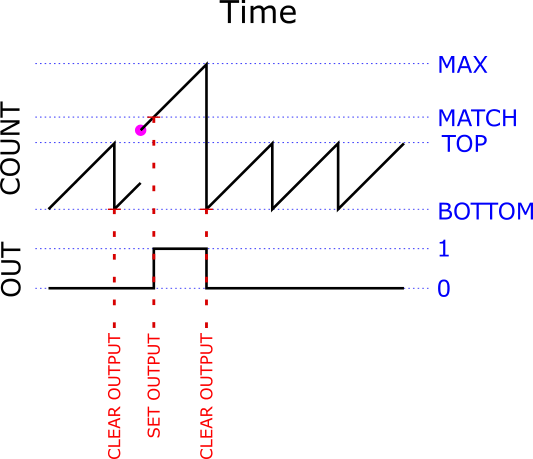
AVR Timer-based One Shot Explained

Last time, we made one-shot pulses using the AVR’s built in hardware timer module. Today we are going to dive deep into the datasheets to see how this technique is able to coax the normally free-running timer into generating a single pulse. Along the way, we will learn about the low level rules that govern the operation of the timer, and use a trick or two to get around those rules. Read on!…

Continue reading

The Perfect Pulse- generating precise one-shots on AVR8

iq4n4 (2)

It is possible to generate one-shot pulses on an AVR that…

  1. Are as narrow as a single clock cycle (63 nanoseconds!)
  2. Are precise to a single clock cycle
  3. Will run to correct completion no matter what else the processor is doing 1
  4. Do not require you to turn off interrupts at all (!)
  5. Do not require any assembly code

These pulses are generated in pure hardware. They require a couple of instructions of interruptible code to fire. Once fired, they are completely autonomous and depend only on the system clock to run to completion.

Sound cool? Read on!

Continue reading

Easy hack to allow an AVR Dragon to power the target device over the ISP cable

TL;DR: You can power a target device from an AVR Dragon over an ISP header by adding a jumper wire from the VCC pin to pin #2 on the header that you are *not* using.

I’ve been a big fan of the SparkFun Pocket AVR programmer, partly because it has a handy little switch that lets you send power to the target device…

Pocket AVR Switch

Unfortunately, I started getting “Error: Could not find USBtiny device” while programming boards using a jig

Continue reading

Battery Fuel Gauge with Zero Parts and Zero Pins on AVR

Blink LED Cropped

It can be nice to know how much battery power you have. It becomes critically important with LiPo batteries since you can permanently damage them by running the voltage down too low. Typically battery voltage detection requires adding a circuit with extra parts and their associated power requirements. Wouldn’t it be great to be able to do this using nothing but software? Read on for a no parts, no pins, no power solution…

Continue reading

Inside Neouart – Tricking a serial port into being a signal generator

Last time, we connected a NeoPixel directly to a RaspberryPi. This is certainly fun and useful, but the real motivation behind this project was to explore clever ways to make use of limited hardware resources. NeoPixels need a precisely timed string of bits to be happy. Luckily, every RaspPi comes with built-in hardware for generating strings of precisely timed bits – a serial port!

If all you care about is making pretty colors the easy way, don’t bother reading this article. If you are wondering how it is possible to reliably generate a pulse train with +/-150ns precision on a Raspberry Pi pin without kernel mods or DMA, then read on!

Continue reading

Save the Earth One Resistor at a Time – External pull-up resistor no longer needed for DS18B20 temp sensor

EXECUTIVE SUMMARY:

Using the updated Arduino 1-Wire library code presented here, you can eliminate the need for an external pull-up resistor for typical small networks of DS18B20 temperature sensors.  This should also work with any AVR processor and other types of 1-Wire devices as well. You can download the updated 1-Wire library here…

https://github.com/bigjosh/OneWireNoResistor/archive/master.zip

The mythical “required” external pull-up

From the DS18B20 Data Sheet

From the DS18B20 Data Sheet

If you’ve ever used the ubiquitous (and amazingly useful!)  DS18B20 family of 1-Wire temperature sensors, you’ve almost certainly used a 4.7K ohm pull-up resistor as well. Every one of the seemingly endless Arduino DS18B20  tutorials on the web starts with some version of the line “You will not be able to do anything with this senor until you go out and procure yourself a 4.7K ohm resistor”. AdaFruit is even generous enough to include one of these resistors with every DS18B20-based temperature sensor they sell (be it bare, waterproof, or hi-temp) because they know you are going to need it.

I am here to tell you that everything is about to change. If you were banking on your stockpiles of 4.7K ohm resistors to be the one reliable store of value in these uncertain times, you need to rethink your long-term asset preservation strategy because the decade-long run of stable demand for this part is about to plummet. Yes – it is now possible to connect DS18B20 sensors without any external pull-up resistor at all!

Outrageous claims demand outrageous proof, so let’s start with a brief demo that proves beyond a shadow of a doubt that this is not just a cockamamie theory, but cold hard fact…

Continue reading

Temperature Logging to a Google Spreadsheet with an Arduino Yun

UPDATE 8/7/2104:It appears that Google occasionally will randomly and silently drop the authorization for an Apps Script web app. If you notice that your spreadsheet has stopped updating and you know that your logger is still working, then you probably need to log into your spreadsheet from a web browser, go into the scripts editor, and manually execute any function in the script. This will cause a popup that will reauthorize the script and everything will then start working again.

I think this is the last straw. I can not recommend using Google for logging (or any other non-trivial application) any more. This stuff is just too flaky. Sorry.

If you are like me, you often find yourself in a situation where you need to log multiple channels of temperature data. From testing nano-insulating paint to debugging an overheating geothermal well, most of us will have need of accurate and frequent temperature logs at some point in our short and brutish lives.

Here is a recipe to make a reliable, cheap, and easy cloud-based, multi-channel temperature logger using an Arduino Yun and DS18B20 temperature sensors. I chose the Yun because everyone loves Arduinos and this one can connect to the internets. I choose the DS18B20 sensors because they are awesome and cheap and accurate and you can hook up lots of them to a single pair of wires.

Continue reading

Using Google Spreadsheets for Logging Sensor Data

UPDATE 8/6/2016:

IFTTT For Makers is also a great way to log data to a good spreadsheet. It does add an extra point of failure, but the interface is very clean and simple.

UPDATE 6/23/2015:

I’ve been using Wolfram DataDrop for about a month now for logging sensor data and I like it much better than Google Spreadsheets. It is reliable and well thought out, and super-duper easy to use. If you take the extra step and drink the Wolfram cool-aid (not necessary to just use the DataDrop), then you can really do some very cool things with shockingly little work.

UPDATE 8/7/2104:

It appears that Google occasionally will randomly and silently drop the authorization for an Apps Script web app. If you notice that your spreadsheet has stopped updating and you know that your logger is still working, then you probably need to log into your spreadsheet from a web browser, go into the scripts editor, and manually execute any function in the script. This will cause a popup that will reauthorize the script and everything will then start working again.I think this is the last straw. I can not recommend using Google for logging (or any other non-trivial application) any more. This stuff is just too flaky. Sorry.


You want to…

  • remotely monitor the temperature in your greenhouse for the past 24 hours, but only have a dynamic IP address on premises
  • keep a historical record of 1,500 wind readings readings per hour from net-connected anemometers at your favorite surfing spots
  • create an earthquake monitoring board that you can distribute to 1,000’s of people and have all the boards report back any earthquakes to a central data store that everyone can see and run analysis on in real-time

Now that Google Spreadsheets can handle up to 2 million cells, they are a great place to log all your sensor data. You can easily view the live data from any computer on the internet and even publish fancy live charts and dashboards. All for free!

Continue reading

The mystery of the Zombie RAM

It all started one bright morning when I wondered: Can the RAM memory on an AVR chip continue to store data after power is removed? If it can hold the data even just for a brief moment, then that could be very useful in a project I am working on.

To test it, I wrote a tiny little program that would check for a a special value in RAM (a “magic cookie”) upon power up and light an LED if it saw the right value…

#include <avr/io.h>

#define MAGIC_COOKIE 0xee00ff55UL // Nice cookie to exercise bits

unsigned long ram_cookie;

void init0 (void) __attribute__ ((naked)) __attribute__ ((section (".init0")));

// This code will be run immedeately on reset, before any initilization or main()

void init0(void) {

    DDRD = _BV(0); // Enable output on LED on pin 19

    if (ram_cookie==MAGIC_COOKIE) { // Is the cookie there?

        PORTD = _BV(0); // Light the LED!

    }

    ram_cookie = MAGIC_COOKIE; // Load the cookie for next run

    while (1); // All done

}

// We never make it to main()

int main(void)
{
}

I also built a very simple circuit with an ATTINY4313 so I could try turning the power off for various amounts of time to get a feel for how long the memory would last without power…

RAM test circuit NC

The idea is that you press the button for a little while to remove power from the chip. If the LED goes on when you let go, then the “cookie” was still valid in RAM and so was safely retained while the power was removed. I was careful to try and make sure that there was no place that power could leak into the circuit when the button was pressed.

After only about 10 minutes of work I was ready to start testing!

Initial results were extraordinary. It seemed like the little AVR could reliably hold data without power for a very long time. I tested progressively longer and longer times, getting up to 10 minutes without power and each time it came back to life with the cookie still intact. My finger got too tired to test any longer.

I was very excited. If you could reliability store data in RAM for more than 10 minutes without power, then this could be a great alternative to FLASH and EEPROM memory in many applications. 10 minutes is long enough to safely change a set of batteries. Don’t get me wrong – EEPROM and FLASH are great and can hold data for decades without power, but they are also thousands of times slower than RAM and they wear out if you use them too much.

So I went ahead and updated my project to use RAM and connected it all up and… it just didn’t work at all. The RAM did not reliably survive the power loss. I was confused. I had to figure why it had worked so well in testing but not at all in the real application. What was different in the project? I slowly cut away parts of the full project until I was left with nothing more that original test setup – and it still did not work. Did I use the same physical chip that I had used the first time? Was there some way I was accidentally powering that first test? Had I accidentally left the debugger connected on the test circuit?

When faced with a really frustrating situation like this sometimes the best thing to do is goto sleep, so I did.

The next morning my mind was fresh and I was sure I would be able to track down the problem. I fired everything up and… now it worked! Ahhhh!!! What was going on? I was sure it was not working the night before and I had not touched anything between then and now. Argh.

So I went ahead and built another full circuit and, of course, again it did not work at all- just like the last full circuit. Luckily this time I had kept the test circuit built just in case. I fired it up and…. it didn’t work either! Ahhhhh! Now I had two not-working circuits and I was getting really, really confused.

Knowing now that I had not changed anything about the test circuit between it working and not working, I assumed the change must be something in the environment. Higher temperatures could plausibly affect RAM data loss since it could lead to higher thermal noise in the silicon. Humidity also seemed like a reasonable candidate since that could possibly allow more leakage current through the air.

I frantically built an Ardunio-controlled rig that could automatically run continuous test passes on the circuit . It varied the power-off time for  each pass while logging the results along with the ambient temperature and humidity. I used relays to completely “air gap” isolate every connection to the chip under test while power was off to be 100% sure that I was not leaking current into it anywhere.

Automated Zombie RAM testing rig

Automated Zombie RAM testing & logging rig

I let that thing run for the rest of the day through thousands and thousand of test passes, but not once did the test circuit ever retain the data longer than 100ms without power – nothing like the 10+ minutes of persistence I was seeing before. I finally had to turn off the testing rig because the rapidly clicking and clacking relays were incompatible with sleep.

The next morning I got up and turned the test rig on again and immediately noticed that the delay between relay clicks was growing longer and longer – indicating successful passes. It quickly made it back up to 10 minutes of retention without a single lost byte. I let it run for a few hours more until the clicks started getting shorter indicating RAM errors. I had all the data from both runs logged, so now it was just a matter of figuring out what was different!

After a bit of number crunching it became clear that neither temp nor humidity were correlated at all with the data retention times. Not even a bit.

It took a good long hour before I finally figured out what was causing these spooky effects and now I can readily control the data retention time of my test circuit  – without even touching it.

Can you figure out what mechanism was at work here?

Turn the page to find out…