Category: hardware
Using Google Spreadsheets for Logging Sensor Data
| UPDATE 8/6/2016:
IFTTT For Makers is also a great way to log data to a good spreadsheet. It does add an extra point of failure, but the interface is very clean and simple. |
| UPDATE 6/23/2015:
I’ve been using Wolfram DataDrop for about a month now for logging sensor data and I like it much better than Google Spreadsheets. It is reliable and well thought out, and super-duper easy to use. If you take the extra step and drink the Wolfram cool-aid (not necessary to just use the DataDrop), then you can really do some very cool things with shockingly little work. |
| UPDATE 8/7/2104:
It appears that Google occasionally will randomly and silently drop the authorization for an Apps Script web app. If you notice that your spreadsheet has stopped updating and you know that your logger is still working, then you probably need to log into your spreadsheet from a web browser, go into the scripts editor, and manually execute any function in the script. This will cause a popup that will reauthorize the script and everything will then start working again.I think this is the last straw. I can not recommend using Google for logging (or any other non-trivial application) any more. This stuff is just too flaky. Sorry. |
You want to…
- remotely monitor the temperature in your greenhouse for the past 24 hours, but only have a dynamic IP address on premises
- keep a historical record of 1,500 wind readings readings per hour from net-connected anemometers at your favorite surfing spots
- create an earthquake monitoring board that you can distribute to 1,000’s of people and have all the boards report back any earthquakes to a central data store that everyone can see and run analysis on in real-time
Now that Google Spreadsheets can handle up to 2 million cells, they are a great place to log all your sensor data. You can easily view the live data from any computer on the internet and even publish fancy live charts and dashboards. All for free!
The mystery of the Zombie RAM
It all started one bright morning when I wondered: Can the RAM memory on an AVR chip continue to store data after power is removed? If it can hold the data even just for a brief moment, then that could be very useful in a project I am working on.
To test it, I wrote a tiny little program that would check for a a special value in RAM (a “magic cookie”) upon power up and light an LED if it saw the right value…
#include <avr/io.h>

#define MAGIC_COOKIE 0xee00ff55UL // Nice cookie to exercise bits

unsigned long ram_cookie;

void init0 (void) __attribute__ ((naked)) __attribute__ ((section (".init0")));

// This code will be run immedeately on reset, before any initilization or main()

void init0(void) {

    DDRD = _BV(0); // Enable output on LED on pin 19

    if (ram_cookie==MAGIC_COOKIE) { // Is the cookie there?

        PORTD = _BV(0); // Light the LED!

    }

    ram_cookie = MAGIC_COOKIE; // Load the cookie for next run

    while (1); // All done

}

// We never make it to main()

int main(void)
{
}
I also built a very simple circuit with an ATTINY4313 so I could try turning the power off for various amounts of time to get a feel for how long the memory would last without power…
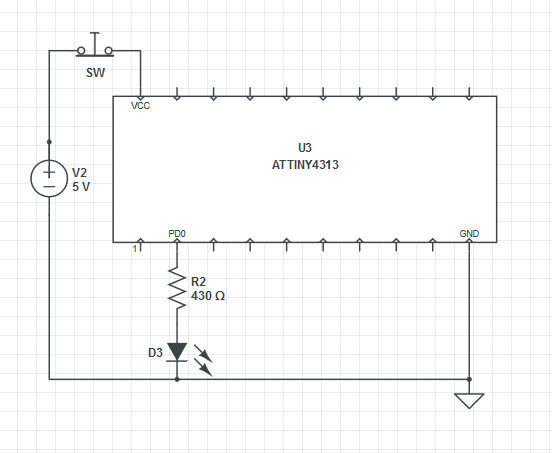
The idea is that you press the button for a little while to remove power from the chip. If the LED goes on when you let go, then the “cookie” was still valid in RAM and so was safely retained while the power was removed. I was careful to try and make sure that there was no place that power could leak into the circuit when the button was pressed.
After only about 10 minutes of work I was ready to start testing!
Initial results were extraordinary. It seemed like the little AVR could reliably hold data without power for a very long time. I tested progressively longer and longer times, getting up to 10 minutes without power and each time it came back to life with the cookie still intact. My finger got too tired to test any longer.
I was very excited. If you could reliability store data in RAM for more than 10 minutes without power, then this could be a great alternative to FLASH and EEPROM memory in many applications. 10 minutes is long enough to safely change a set of batteries. Don’t get me wrong – EEPROM and FLASH are great and can hold data for decades without power, but they are also thousands of times slower than RAM and they wear out if you use them too much.
So I went ahead and updated my project to use RAM and connected it all up and… it just didn’t work at all. The RAM did not reliably survive the power loss. I was confused. I had to figure why it had worked so well in testing but not at all in the real application. What was different in the project? I slowly cut away parts of the full project until I was left with nothing more that original test setup – and it still did not work. Did I use the same physical chip that I had used the first time? Was there some way I was accidentally powering that first test? Had I accidentally left the debugger connected on the test circuit?
When faced with a really frustrating situation like this sometimes the best thing to do is goto sleep, so I did.
The next morning my mind was fresh and I was sure I would be able to track down the problem. I fired everything up and… now it worked! Ahhhh!!! What was going on? I was sure it was not working the night before and I had not touched anything between then and now. Argh.
So I went ahead and built another full circuit and, of course, again it did not work at all- just like the last full circuit. Luckily this time I had kept the test circuit built just in case. I fired it up and…. it didn’t work either! Ahhhhh! Now I had two not-working circuits and I was getting really, really confused.
Knowing now that I had not changed anything about the test circuit between it working and not working, I assumed the change must be something in the environment. Higher temperatures could plausibly affect RAM data loss since it could lead to higher thermal noise in the silicon. Humidity also seemed like a reasonable candidate since that could possibly allow more leakage current through the air.
I frantically built an Ardunio-controlled rig that could automatically run continuous test passes on the circuit . It varied the power-off time for each pass while logging the results along with the ambient temperature and humidity. I used relays to completely “air gap” isolate every connection to the chip under test while power was off to be 100% sure that I was not leaking current into it anywhere.
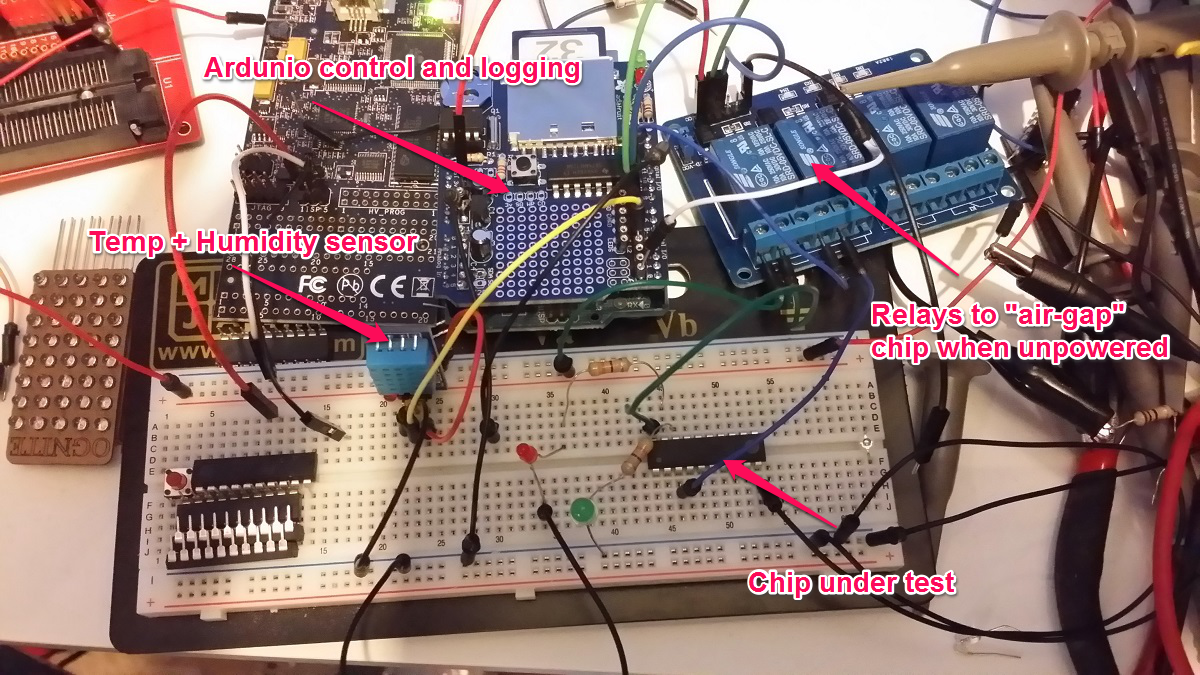
Automated Zombie RAM testing & logging rig
I let that thing run for the rest of the day through thousands and thousand of test passes, but not once did the test circuit ever retain the data longer than 100ms without power – nothing like the 10+ minutes of persistence I was seeing before. I finally had to turn off the testing rig because the rapidly clicking and clacking relays were incompatible with sleep.
The next morning I got up and turned the test rig on again and immediately noticed that the delay between relay clicks was growing longer and longer – indicating successful passes. It quickly made it back up to 10 minutes of retention without a single lost byte. I let it run for a few hours more until the clicks started getting shorter indicating RAM errors. I had all the data from both runs logged, so now it was just a matter of figuring out what was different!
After a bit of number crunching it became clear that neither temp nor humidity were correlated at all with the data retention times. Not even a bit.
It took a good long hour before I finally figured out what was causing these spooky effects and now I can readily control the data retention time of my test circuit – without even touching it.
Can you figure out what mechanism was at work here?
Ognite Digital Candle Finally Reaches Beta 2

This new version is wildly more power efficient, so an Ognite should now be able to run continuously for months on a couple of AA batteries. You can read all about the Ognite here…
…and about the update progress here…
Now if I can just find a solution to the battery holder problem, this project can finally go into production. Anyone?
Citibike Key Fob Brain Transplant
UPDATE 12/9/2013:
You can now get a key card directly from Citibike!
UPDATE 8/13/13:
Looks like they’ve changed the way the chip is being installed, so this method will not work for newer FOBs. I’ll post back once I figure out a new good way to get the chips out.
I love CitiBikeNYC but the key fob doesn’t fit into my wallet and I don’t carry keys, so I removed the tiny chip from inside the fob and put it inside my credit card. Now I am much happier and don’t have to carry anything extra around to use CitiBike.
.
It only takes about 5-10 minutes of work.
1. Open your key fob using a mat knife. I just carefully kept running the blade across the seem around the edges of the fob, scraping a little plastic out with each pass. After a minute or two I was able to wedge the blade into the crack and pry the halves apart.

2. Carefully take out the square of tape that has the RFID chip stuck to it. Be really careful not to hurt the tiny wires.
3. Drill a hole in the bottom right corner of your credit card (so it will still work. A 3/16th bit is perfect. I sandwiched the card between one half of the fob shell (as a template to locate the hole) and a block of wood. If you also have a larger drill bit too, you can twist it in the hole with your fingers to clean up the sides of the hole.

4. Stick the RFID chip and coil into the hole by sticking the tape to the back of the card.
5. Mix up some epoxy and put a drop of it on top of the RFID chip in the hole to protect it. I used DevCon 5 minute epoxy that I got from the hardware store and it worked great. Mix up more epoxy than you think you’ll need. I used a disposable chopstick and soy sauce tin that came with dinner last night. Don’t be afraid to use the chopstick to smear the drop of epoxy around to make sure it covers the chip and fills in the hole and even spreads out a little over the lip of the hole.

6. Let it sit for maybe an hour to let the epoxy dry, and then go borrow a bike!
You can get all the tools you need for this project at the Seaport Tool Library.
Here is the 6 second version…

First look at distance measurement using the AT86RF233 chip
Thanks to my long-term CNC Mower project, I am always on the lookout for new ways to do local positioning sensing. I’ve played with spinning lasers, fancy DGPS’s, sonar, and boundary wires but none of them are just right. I want centimeter scale repeatability with a range on the order of 100’s of meters updated at least once per second. Cheap, small, and power efficient are also important factors since my goal is to have maybe a half dozen of these little solar powered mowers roaming the fields.
I recently saw a mention of a new Atmel chip that seems to be able to do radio range measurements. It looked exciting.
The AT86RF233 is an Atmel chip that is cheap (<$3 in quantity and <$5 for 1), very low power (milliwatts), and easy to interface to a microcontroller (SPI interface), so it would seem perfect for my project. Unfortunately, I could not find even the most basic information on its ranging capabilities like how far it can go and how accurate it is.
I got a few of the eval boards to play with to find out for myself. Here are some very early findings.
The bad
The boards are way too expensive at $379 per pair. They don’t have a serial boot loader pre-programmed so you need to own (and know how to use) an Atmel compatible programmer just to play with the ranging function. The chip is only available in an impossible to solder QFN package. Huge barriers to entry. If anyone at Atmel is listening, you should sell these boards at cost (probably <$25) and preprogram them with a serial boot loader so people can plug them into their USB ports and start playing with them. Why not also offer a friendly 20 pin DIP package? We also need a few app notes with functionality overview, details on the ranging theory, best practices on how to use the actual on-chip registers, and maybe some reference designs for antennas.
Indoor Test
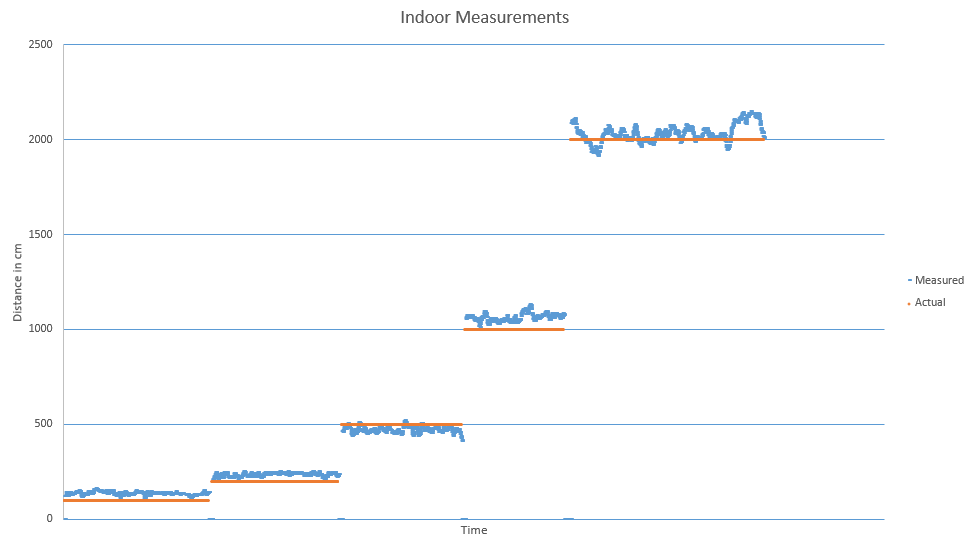
I tested in my RF noisy NYC apartment using a Leica laser rangefinder as reference. Out-of-the-box default settings with the default quality-weighted range estimation.
Outdoor test
I tested in a huge, flat 20 acre field far away from any RF noise. I cranked transmit power to maximum. I logged all 4 antenna combinations (two stations each with 2 antennas). I sampled every 2000cm up to 8000cm. I forgot to turn off the radio when I walked from 6000cm to 8000cm. I used a fiber reel measuring tape for reference.

Here each dot is a sample and the color indicates the sampled antenna pair.
If I filter out on the best overall pair (the grey dots), it looks like this…
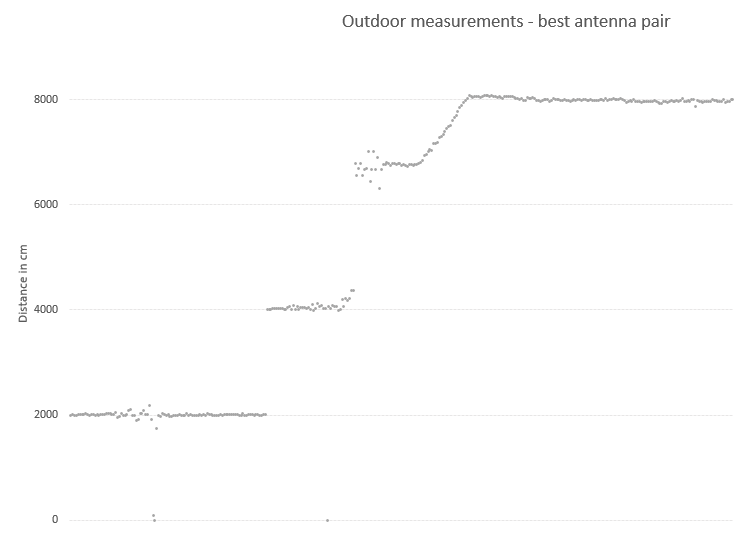
This looks promising.
I think there is room for improvement by…
- Only using a single antenna pair optimized for the location
- Dynamically adjust output power based on estimated distance
- Filter nonsense samples and samples with low signal quality
This weekend I am going to try to test with some of these improvements, and I am going to use 3 base stations to do oversampled 2D location finding. Check back next week for results!
If all goes well, next steps are to…
- Design and build a stand-alone base station with an AT86RF233 and an ATTINY to do very basic . This will be battery powered with optional solar charging. Weatherproof case. Hopefully this unit can be built for less than $25 per unit so it will be possible to put lots of them around a sensing areas.
- Design and build a shield with just enough (chip, xtal, antenna) to make it possible for an Ardunio to be a rover. Also hopefully less than $25.
- Put it on a few robots and start mowing hi-res Google Earth messages!
-josh