Blinking Blue- Powering a 3.7 volt LED from a 2.4 volt coin cell with a $0.02 charge pump

Everyone loves blue LEDs and everyone loves coin cell batteries, but if you want to power a blue LED from a coin cell you will need some help. Here is a super-cheap and easy way add a to boost your LED voltage with only an additional capacitor & diode, and a little software.

I love that Atmel AVR chips (ATTINY, ATMEGA, Arduino) can run directly on battery voltages from 1.8 volts up to 5.5 volts. I also love that they can drive LEDs directly connected to their IO pins. If you connect a ATTINY directly to a CR2032 and a red LED and blink your life away until the battery is almost completely dead.
Red LED easy, Blue LED hard

Most blue LEDs need more than 3 volts to light up. A brand new CR2032 coin cell makes about 3.2 volts on a good day, and it is all down hill from there. So how can we light a blue LED from a coin cell?
We need more volts, Schottky!
The typical way is to use a boost converter to boost the battery up to a fixed voltage higher than the blue requires and then feed that into the Vcc of the chip. There are some very nice integrated boost converter chips available, but they are expensive (~$1) and require adding a half dozen parts to your design.

This is also power inefficient because chips like the ATTINY use more power at higher Vcc voltages.
You can also roll your own minimal boost converter with an inductor & transistor and a bit of software too. It looks something like this…

It totally works and being able to harness the power of a collapsing magnetic field does impress folks, but inductors are relatively expensive and transistors are fancy goods where I come from. What is a humble cheapskate hacker to do? What is the absolutely most simple and low cost way to light our blue LED?
LESS-IS-MORE HACKER BONUS QUESTION!

It is possible to make an AVR-based LED booster using just an inductor – no transistor needed!
Can you figure out how?
Free tee-shirt to the first correct answer here!
(I will be so fricken impressed if you get this)
Pump up the volts, pump them up!
This, gentle readers, is a souped-down charge pump…

Normally charge pumps are more extravagant affairs, but we are cheating by also using the LED as a blocking diode, and using the IO pin as the oscillator. Cool, right?
How the pump works
It really does work like a water pump. Imagine that the capacitor is a diaphragm (like in an expansion tank) and the LEDs are pressure reducing check valves. The diode forward voltage is the minimum open pressure of the valve. The blue valve needs more pressure to open than the PWM output supplies.
When the PWM goes high, it pushes on the diaphragm which pushes fluid down though the bottom valve. When the PWM then goes low, it sucks back on the diaphragm which shuts the bottom valve and creates a vacuum in the tee between the two values. The top valve opens (blue LED lights up) when it sees the full pressure across it rise above its minimum open pressure (forward voltage). The pressure across it is the sum of of the head from the battery above plus the vacuum below – which totals more than just the battery.
It really is a very good analogy and the water based system would totally work if you built it. I kinda want to. I wonder if there are any practical applications for this?
If you prefer to think in electron flow rather than water flow, check out this simulation on EveryCircuit…

The purple trace is the PWM output going from 0 to 2.4 volts. The green trace is the voltage at the node between the two diodes and it goes from a little less than 1 volt to a little more than -1 volt. The reason that the green trace doesn’t swing all the way between 2.4 volts and -2.4 volts is because of the forward voltage drop in the diodes. See the pumping action?
The negative voltage in the green trace is what makes this work. The LED sees the the positive voltage pushing down in its top and the negative voltage pulling down on its bottom. The total voltage across it is more than the battery voltage we started with.
Built it and it will light
If you want to actually see this working on your bench, grab yourself some…
- ATTINY85
- 0.1uF capacitor
- Blue LED
- Almost any diode
Program up the ATTINY with this code…
This file contains hidden or bidirectional Unicode text that may be interpreted or compiled differently than what appears below. To review, open the file in an editor that reveals hidden Unicode characters.
Learn more about bidirectional Unicode characters
| /* | |
| * ATTINY85-LED-Boost.c | |
| * Full article at | |
| * http://wp.josh.com/2017/03/20/blinking-blue-powering-a-3-7-volt-blue-led-from-a-2-4-volt-coin-cell-with-a-0-02-charge-pump | |
| * | |
| */ | |
| #include <avr/io.h> | |
| #define F_CPU 1000000 // 1MHz, default for 8MHz internal osc and clkdiv8 | |
| #include <util/delay.h> | |
| int main(void) | |
| { | |
| DDRB |= _BV(0); // Pin 5 = Output | |
| while (1) // Blink forever at about 5Hz (100ms oscillating, 100ms off) | |
| { | |
| // This top section oscillates pin 5 at about for about 100ms | |
| for(int i=0; i<10*100;i++ ) { // Each loop pass takes about 100us, so this for() will take ~100ms | |
| // This is a 10KHz (50us high, 50us low) oscillator on pin 5 | |
| PORTB |= _BV(0); | |
| _delay_us(50); | |
| PORTB &= ~_BV(0); | |
| _delay_us(50); | |
| } | |
| // This leaves pin 5 low for 100ms | |
| _delay_ms(100); | |
| } | |
| } |
…and connect it up like this…

Ooh! Gaze at the pretty blue light!
Perfunctory Video
Unsexy details
This charge pump works by blinking the LED on once per cycle. If it blinks quicker than about 60 times per second, then it just looks like it is on to your eyes.
The perceived brightness is a function of (1) how bright each individual blink is, (2) how long each blink lasts, and (3) how long the LED is off between blinks.
The first two are dependent on the battery voltage and the size of the capacitor. The last one is dependent on our software driving the IO pin.
How long should we wait between blinks? How big should the capacitor be?
The smaller the capacitor the shorter each blink will be, so smaller capacitors require shorter times between blinks to maintain the same brightness level.
I used a 100nF cap because it is what I had, and 10KHz is the first oscillator frequency I tried and it seemed to work fine.
The included code bit bangs the port for clarity, but in real life you would almost certainly want to use a hardware Timer to generate the PWM output. The AVR Timers are well suited for this because you can easily control the LED brightness using the Timer’s TOP value, which changes the time between blinks.
FAQ
Q: You said you can connect an LED directly to an IO pin. You can’t. The world will blow up and you will go to hell.
A: You can. I do it all the time and I am still here on earth. I have shipped hundreds of thousands of products without a single current limiting resistor in them, and they have been intimate parts of people’s lives for years without a single case of the world blowing up (or even an LED related failure). I need to write a full article about why this works and why it is good.
Q: If you connect the chip and LED directly to the battery, then the LED will be too bright when the battery is full and slowly get dimmer as the battery drains.
A: You can dynamically adjust the output PWM in software based on the current battery voltage to maintain a constant brightness.
Q: I have a blue LED that happily lights at 2.6 volts. Why don’t you just use these?
A: I have some of those also and they are so cool. If you can find one that suits your application and you don’t mind going dark when your battery eventually drops below 2.6 volts, then you can skip the charge pump. However, there are times when you want to pick your Blue LED based on other parameters (price, form factor, availability) and so it is nice to buy the flexibility to use pretty much any Blue LED for just $0.02 in extra parts. For example, here is an RGB LED that costs $0.016 (!) that needs 3.2 volts to light blue. The nearest low voltage replacement part I could find lights at 2.8 volts and costs $0.06. For a board with 6 RGB LEDs on it, this charge pump gives a net savings of $0.24, along with slightly longer run time (because we can run the battery down to a lower voltage before we loose blue) and flexibly to potentially use other LEDs in the future.
Q: Wait, you are totally over-currenting that LED when the IO pin goes low! It is going to smoke!
A: Chill out. Remember that the IO pin is current limited in the chip. This limits how fast we can discharge the cap, which limits the current flowing though the LED. It is all going to be OK.
Q: Where did you hear the most awesomest hack-a-day-crowd sentence ever? (“We need more volts, Schottky!”)
A: I know! Awesome right?! So good at so many levels. I made that up myself! I pretty much wrote this article as an excuse to use that sentence.
Q: Does this only work on AVR chips?
A: You should be able to get this to work on any IO pin on any micro-controller chip.
Q: Why bother with all this, I never have any problems driving blue LEDs on my Arduino.
A: A proper Arduino runs from 5 volts, so will drive a 3+ volt blue LED with ease. But a proper Arduino is power hog. Charge pumping starts to matter when you want to make things that run for a long time off batteries, in which case connecting low (and variable) voltage batteries directly to the chip is more efficient.
Q: In your roll-your-own boost converter, why not omit the transistor and connect the inductor directly to the IO pin?
A: It will not work. The IO pins* have ESD protection diodes that prevent their voltage from going lower than ground or higher than Vcc, so when the inductor started to boost, the protection diode would turn on and short out that excess voltage.
Q: Do I need a Schottky diode?
A: You can probably get a blue LED working with a 3 volt coin cell and almost any normal diode. That said, Schottky will be more efficient and keep working down to a lower battery voltage. It also makes for better section titles than “We need more volts, general purpose silicon switching!”.
Q: How high of a voltage can I make? I want to power my house with this!
A: With one cap and diode, you can make about double the Vbat voltage less the forward voltage drop of the bottom diode. So, with a dying coin cell at 2.4V and a Schottky diode with a forward drop of 0.2v, you should be able to get about 4.6 volts. Enough to light a blue LED. Don’t over think this.
Q: Still, converting 2.4 volts into 4.6 volts is above unity! If I use rechargeable batteries, then I can use the 4.6 volts to have one battery recharge the other back and forth and make a forever glowing blue flashlight and put big oil out of business!!!
A: Nobody loves making over unity devices more than me, but in this case the piper must be paid. The 4.6 volts is almost double input voltage, but it is only on for less than half of the time. This is perfect for lighting an LED because you can’t see it blinking if blinks fast enough, but for charging (even a perfect) a battery, you’d find that the source battery would go dead when the destination battery was less than half full.
“Remember that the IO pin is current limited in the chip.”
They are not. There is a current limit, but no current limiter. Typical AVR is 40-60 mA continuous. The 1 µF capacitor at 10 kHz presents an impedance of about 16 ohms and the voltage drop of the diode eats up most of the voltage, giving you somewhere around 100 mA current through the pin – it’s only the short duty cycle that keeps the chip and the LED from being fried. Not all micros are this robust – some won’t tolerate any overcurrent, even in short pulses.
I respectfully disagree. Take a look at this graph from the data sheet…

There is a linear relationship (essentially resistive) between current and pin voltage. As the current rises, so does the pin voltage until there is an equilibrium that limits the current from rising higher. The pin acts like it has an internal current limiting resistor of about 20 ohms. There are other effects that further limit the maximum current though an IO pin, like the ESR of the power source.
You can verify this by connecting a low voltage LED directly to the IO pin (no cap, no diode) and driving the IO pin low and measuring the current that flows though the LED.
Make sense? Agree? Please respond, if not- this is an important topic to me and I want to make sure I fully understand it! Thanks!
The source and sink in the AVR is fairly symmetric, with an impedance of roughly 20 Ohms with variation so you can’t rely on it. Other AVRs and other micros may sink or source better or worse. When you’ve got 5 Volts and say a red diode at 2.3 Volts drop, the remaining 2.7 volts causes 135 mA of current to flow. Even adding the 16 ohms impedance from the capacitor you’ve got 75 mA going so you’re really relying too much on the impedance of your power supply.
If someone decides to replace the 3.0 V button cell with a pair of AAs, you may get up to 50 mA with a diode just wired straight to the pin – although a typical diode would get hot inside and its resistance increases very quickly, but that’s still not nice for the diode or the AVR since the recommended sink/source current is half the maximum.
Notice also that a diode also has capacitance, which acts in parallel to the voltage drop, so if the diode is reverse biased to begin with, there is an initial current rush to forward bias the diode.
Besides, a common indicator or clear “superbright” LED doesn’t like more than 15-20mA continuous/average current anyhow. They heat up and dim permanently above 20 mA.
All true, but isn’t this true of a standard LED current limiting resistor as well?
If someone connects a significantly larger power supply voltage than the circuit was designed to handle, then the LED is potentially going to see more (possibly too much) current. This is true with either the intrinsic current limiting behavior of the IO pin *and* with an external current limiting resistor, so not really an argument in favor of one or the other.
All an external resistor does is change the trade-off of current at over-voltage for current at nominal voltage. I think there are better and more efficient ways to do this – like compensating the PWM duty cycle based on internally measured supply voltage. In this case, all an extra resistor does is raise the minimum voltage needed to maintain a minimum brightness level- and unnecessarily burn power in ohmic losses in the resistor. Both contribute to reduced run time.
Two points.
1) The current will be too much even within the normal input voltage range of the AVR. Furthermore, the IO impedance of the AVR drops as the supply voltage increases because the transistors are driven harder.
2) The question wasn’t about the voltage, as going from a 3.0 V button cell to 2xAA isn’t going to increase the voltage significantly, but about the ESR of the battery. The coin cell has high resistance, while the AAs, especially rechargeables, can supply amperes of current, and will easily exceed the 20 mA current limit of the diode, and quite possibly exceed the 40 mA limit for the AVR IO pin.
If you’ve got an AVR supplied with 5 Volts, it’s a good idea to have a ~120 Ohm resistor in series – significantly higher than just relying on the internal resistances. Mind your tolerances: if you give +-10% for the AVR and the resistor, the worst case scenario will see a red diode at 21 mA and a blue diode at 14 mA. Nominally you’d expect 12-19 mA which is just fine.
For 3.3 Volts supply, a red diode will do with a ~50 Ohm resistor, while a blue diode won’t work, so you got the voltage doubler going and you need to calculate what that makes and how much overpotential you have left over etc. Considering your duty cycle will be lower, you may exceed the 20 mA limit, but again mind your tolerances.
A common LED will shine quite brightly even at 10-15 mA, and you’re not going to get much more light out of it because increasing the current will increase the junction temperature, which decreases light output – permanently if the diode overheats. There’s no sense in designing circuits which may pass overcurrent to the LED because you’re just wasting your battery.
“and unnecessarily burn power in ohmic losses in the resistor.”
If you actually calculate the power loss in the resistor, let’s say 120 Ohms at 15 mA, it turns out at 27 mW. The LED on the other hand will be at 34.5 mW. That’s an efficiency of around 55%
So far so good. Now if you remove the resistor and let the LED have what the AVR IO will give, it will see more current – limited by the diode itself as the forward voltage drop starts to increase with current and temperature – and your battery will drain faster, but the LED won’t shine any brighter because it overheats. Your efficiency in terms of battery power vs. light output actually decreases.
Of course you may strobe the light at a low duty cycle to drop the average current down. That’s a legit way of doing it if you can be sure that the rest of the circuit ESR is known and steady. I wouldn’t recommend it for the generic case.
Oh, and speaking of the fwd-drop: notice that e.g. a red diode can have 2.3 Volt drop at 20 mA but may have 2.1 V at 10 mA so its somewhat self-regulating against falling battery voltage. With blue-white LEDs this effect is even more pronounced. Just something to keep in mind.
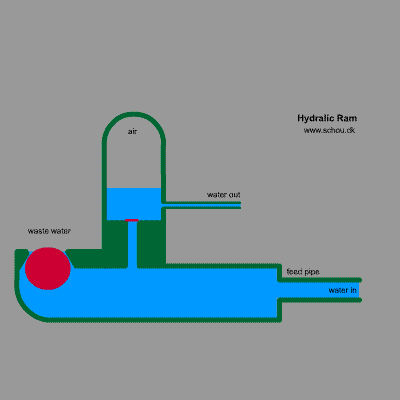
“It really is a very good analogy and the water based system would totally work if you built it. I kinda want to. I wonder if there are any practical applications for this?”
Yes, there is a practical application for the water-based system.
It was worked out in 1796, by Montgolfier, the famous balloonist. It uses check valves instead of diodes, and uses the inertia of flowing water instead of a capacitor to temporarily store the energy from a lower-head stream of water; and a flow-operated valve instead of a microprocessor to turn the low-head water on and off.
This hydraulic ram pump provides a smaller volume of higher-head water using the energy of a larger volume of lower-head water. It operates in pulses, just like the charge pump you describe.
The Montgolfier ram pump looks just like an inductor boost to me. The inertial mass of the incoming water is the inductor. The closing of the valve is the sudden stopping of the current (literally in this case!) that generates the increase in pressure (voltage).
Here is the electrical equivalent circuit boosting 10V to 15V…

You can simulate it here…
http://everycircuit.com/circuit/6524245628944384/ram-pump