A platform for casual encounters with interactive technology – Getting Started
…you should be able to get this working about 2 minutes…
For a super-simple starter project, we will let passers-by remotely control the built-in red LED on the board. Boring – but you should be able to get this working about 2 minutes and it will be easy to extend to more exciting encounters later.
Here is what it looks like…
Step-by-step setup instructions…
- We will start with a stock Yun out of the box. You can reset your Yun back to this state by pushing and holding the “Wifi Reset” button for 30 seconds.
- Connect the Yun to your computer – probably via USB. Make sure you select the correct port under Tools->Port and the Yun board under Tools->Board.
- Copy/paste the BlinkMeSetup sketch [GET CODE] into your Arduino IDE and upload it to the Yun. You can connect via Serial Monitor in the IDE after the upload completes if you want to watch the action, but it is not necessary.
- Wait for the red LED to start blinking a steady once per second. This will let you know that the setup script has completed. It takes about a minute to finish – longer if you recently rebooted the board.
- Copy/paste the BlinkMe sketch [GET CODE] into your Arduino IDE and upload it to the Arduino Yun.
- Take out your cellphone and connect to the new BlinkMe Wifi network coming from the Yun.
- Make the light blink! Yeay!
The full code for this project is available on GitHub here.
How It Works
The BlinkMe control webpage has two buttons – on and off…
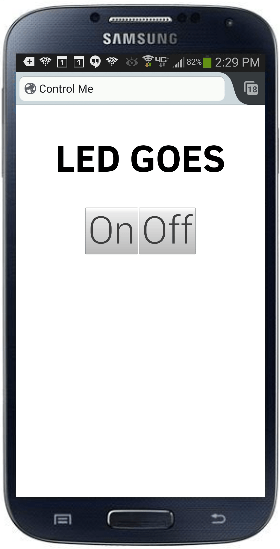
Here is the HTML code for the controller page…
[code language=”html”]
<!DOCTYPE html>
<title>Control Me</title>
<script>
function send(s) {
r=new XMLHttpRequest();
r.open(‘GET’,’/cgi-bin/control.cgi?COMMAND=’+s+’&’+(new Date()).getTime(),false);
r.send(null);
}
</script>
<center>
<H1>LED GOES</H1>
<button onclick=’send(1);’>On</button>
<button onclick=’send(0);’>Off</button>
<hr>
</center>
[/code]
You can see that the on button has a send(“1”) and the off button has a send(“0”) wired to it. There is nothing special about the values “1” and “0” – whatever is in the send is what gets eventually to our code running on the Arduino.
Now let’s look at that code running on the Arduino side that receives these commands. Check out the loop function in BlinkMe.c…
[code language=”c”]
…
void processCommand( const char *commandString ) {
// Use the first byte to specifiy action…
switch (commandString[0]) {
case ‘0’:
pinMode( LED_PIN, OUTPUT );
digitalWrite( LED_PIN , LOW ); // Turn off the LED
break;
case ‘1’:
digitalWrite( LED_PIN , HIGH ); // Turn on the LED
break;
}
}
…
[/code]
We are checking the first character of the received command and if it is “1” then we turn on the LED and if it is “0” then we turn off the LED. Note that we are ignoring anything else that might be received after the “1” or “0”, and we fail gracefully if there is anything that is not a “1” or a “0”. This is important because people could theoretically send anything they wanted to the Yun over the open link and we want to make sure they that can’t cause any problems.
If you can’t wait to put this out in public, make sure you change the root password on the Yun to something besides the default of “arduino” or else someone can pwn your setup. To change the password, connect to the Yun over Wifi and pull up the admin pages at http://192.168.240.1/luci.
Tune in next time when we will add a slightly more complicated (and annoying!) feature!
FAQ
Q: Why not use the sketch /www subdirectory to get the HTML files onto the Arduino?
A: This feature seems to require you to have an SD card mounted and then you need to manually execute shell commands to get it to work. Just seemed easier to ECHO the files from an easily downloaded setup sketch. Please let me know if I am missing somewhere here.
Q: Why do you run a second uhttpd server on port 8080?
A: This secondary server does nothing but issue HTTP 302 redirects back to the primary server, which serves the control page. But why do we need this? Because we don’t know what page the phone is going to ask for, so we must be ready to serve a redirect for any page (including root). I could not find a good way to have a single uhttpd server that could both serve normal pages and also serve a CGI script for any other requested but not found pages.
Q: How did you get the control screen to pop up automatically upon Wifi connection?
A: This is easy for iPhones- as long as you give them a redirect when they ask for their magic “phone home” page, they will generate the login popup. Android phones seem to be more picky – none of the Android phones I tried will generate a popup if the redirect target webserver is on the same subnet as the phone itself. Instead the phone sits there and eventually says “internet connection is unstable”. To get around this, I use a DNSMASQ alias to send all web requests to the made-up address 1.1.1.1 just to trick them. I have never seen this documented before and even tried to find it in the Android isCaptivePortal source, but couldn’t. If you know where this behavior comes from, please let me know!
Q: Why are the buttons so tiny on my phone?
A: To keep things simple, I am using just generic HTML in these examples. In future episodes, we will use CSS to make the buttons look very nice on phones.
Q: Can I use this on other OpenWRT devices besides the Yun?
A: Sure! You can download a shell script that will directly set everything up here. Then you just have to change the /cgi-bin/control.cgi to communicate with your project how ever it is set up.
Q:Why is there a 300ms delay between when I hit the button on the webpage and when the light comes on?
A: This is caused by the mobile web browser waiting to see if you are going to double-click before sending the button press. We will fix this in later episodes.
Q: Can we do more than just turn an LED on and off?
A: Stay tuned!
Q: Is there any way to send data back from the Arduino to the web control page?
A: Stay tuned!
Q: Is there any way to log visits to the controller web page?
A: Stay tuned!