Build a giant live scrolling tickertape display from WS2812B Neopixels and an Arduino Uno
Display live scrolling sports scores, crypto prices, or hot tweets on the side of your favorite newspaper building. All you need are some cheap pixel strips, an Uno, and a 5 volt power supply (I used a USB charger with the connector cut off).

Demo video and easy instructions below!
Introduction
What started out as a proof of concept for parallel processing on a microcontroller has become a 20-foot tall Angry Birds game, Star Wars Mouse Droid, EDC Music Festival Message Flag, a (student-built!) School Info Center, and so many more!
This ultimate update adds the #1 most requested feature – the ability to update the display in real time with live data over either USB or Bluetooth. That’s right – you can now have a Python program running on a Raspberry Pi that pulls bitcoin prices from the internet and displays them on the sign in real time. Happy now?
The code has also been completely reworked to be as simple and reliable as possible. Almost anyone should be able to understand and modify it.
Perfunctory Video
Features
- Uses cheap and easy to buy pixel strips, and a ubiquitous Arduino Uno.
- Display can be very long (100’s of feet) because it generates the pixel signals on the fly rather than using a frame buffer.
- Easily fed with live data using the Arduino’s built-in serial port which shows up on whatever computer it is plugged into.
- Can also be fed by any bluetooth device using a cheap and easy to buy HC-05 adapter (or anything else that has a 5 volt serial TX pin).
- Includes 6 premade fonts and it is easy to edit those or make your own.
- Easily editable code.
Hardware Setup Looks Like This

You do not need to use a breadboard to connect the ground wires – you can just twist them together.
You can connect the power supply to the same end of the strips that the Arduino is connected to if that is easier. In this case, the ground from the power supply is connected to both the Arduino and the strips.
Code drop
Full code here…
https://github.com/bigjosh/SimpleTickerTape
Instructions
1. Get 7 strips of pixels.
- These can be Neopixels, WS2812B, WS2813, or SK6812. (All these use compatible protocol and timing)
- You can get them from Amazon or Aliexpress or Adafruit or anyplace else.
- I used the 60 LED per meter kind because they are cheap and text looks nice, but other kinds can be nice too depending on how you lay it out.
- Strips can be as long as you want, basically limited by your ability to power them.
- Code is written for RGB style pixels, but you can make it use RGBW by uncommenting a single line.
- You can use either 5-volt or 12-volt pixel strings, just make sure your power supply matches (below).
- You can use fewer strips if you want, but then you will have to edit the font to make it shorter.
2. Connect all of the “ground” pins from the strips to one or more of the ground pins on the Arduino.
- It doesn’t matter which ground pin on the Arduino you use (there are 3).
- If your strips have loose power wires coming out the end, you can twist all the black ones together and then connect those into the ground pin. Or you can use a grounding strip.
- I used breadboard jumper wires because then I could plug them into a breadboard strip which was easy.

3. Connect each one of the “data in” pins from the strips to the corresponding digital pin on the Arduino, starting at Arduino pin 1 and going to Arduino pin 7.
- The strip connected to Arduino pin 1 will be at the bottom of your display. The text flows away from the Arduino.
- Again, I used some breadboard jumper wire, which is handy because you can stick it into the plugs from the strips and then stick it into the socket on the Arduino.
- You can ignore the power pin on this end of the strip, and you can also ignore the “BI” pins if your strips have them like the WS2813 does).
4. Connect the strips to a DC power source.

- Most strips use 5 volts, but some use 12 volts, you should know which kind you bought. They also will usually have either “5V” or “12V” printed on the strip. If you really have no idea, try one strip with a 5 volt supply first and see if it works.
- Connect the power supply “positive” or “+” side to the red wires from the strips and the “negative” or “-” side to the black wires.
- Do not connect the power wires backwards! This is the one way you can really break stuff and make smoke!
- You can twist all the wires together, or use terminal bars to make connections if you are fancy.
- You can use any power source that gives you enough amps to keep the strips lit up.
- Strips use more power when the pixels are on brightly. If you only use less bright colors then you can get by with much smaller power supplies.
- A 2 amp USB charger can power seven 1 meter long strips at the default color brightness.
- If you are going to use really long strips, you can get a big power supply like this which can power a couple of thousand pixels, or you can use lots of smaller supplies connected at different points along the length of the strips (see video here). There is plenty of info on the internet about powering long strips of pixels!
- For short strips running with very dim colors, you can even get away with powering the strips from the Arduino’s 5V pin, but people will get mad at you for doing this.
- Lots more info on powering pixels over at AdaFruit.
5. Load up the SimpleTickertape.ino sketch into your Arduino.
- You can do this by plugging the Arduino into a computer, running the Arduino IDE, and then copying/pasting the code from here, and clicking the run arrow (
 ) in the IDE. (It might be easier to copy the code if you click on the “Raw” button on the webpage.)
 - You should see a sample message scroll across your LED strips!
- To maximize your chances of success, the program only drives the first 60 pixels and uses a not-so-bright red color. We can change these later once everything is working.
- If you are using RGBW strips then you must make the edit below for them to work right.
6. Try typing your own text directly onto the tickertape from your computer!
- Pick “Tools->Serial Monitor” from the Arduino IDE top menus.
- Pick “No line ending” and “9600 baud” from the pickers on the bottom of the serial monitor window.
- Type “Hello me!” in the input bar at the top of the window and press enter. You should see your message scroll onto the tickertape!
7. Edit the code for your own use.
- Update the
PIXEL_COUNTdefine at the top of the program to match how long each of your strings are. - Update the
FRAME_DELAYdefine if you want to scroll faster (lower number) or slower (bigger number). - Update the
COLOR_Xdefines to make a color you like. R,G, and B stand for red, green, and blue and each of these numbers can be 0-255. The bigger the number, the brighter the color. Start with low numbers since these pixels can be bright and setting bright colors can overtax your power supplies. - If you are using RGBW strips (these have an extra white LED in each pixel besides the red, green, and blue ones) then uncomment the
COLOR_Wline by deleting the two back slashes in front of it. - You can also change the font by turning
0‘s into1‘s and vice versa. You can also make the font wider or skinnier if you want by changing the value ofFONT_WIDTHand adding or removing lines from each character to match the new width. LMK if you make a cool new font or need help converting an existing font to this format (there are some hacked-up programs to help here). - Change the code to do whatever you want! Except for the part that actually sends out the pixels (which has to be really fast), the program should be pretty easy to understand and modify.
Bluetooth control
You can control your new ticker from your phone over bluetooth! You will need a bluetooth adapter like the HC-05, which you can get from Amazon for less than $10.
UPDATE: HC-05 will not work with iPhones, you need something like AT-09 which is about $5 on Amazon.
Connect it to the Arduino like this…

Then pair the HC-05 to your phone by pressing the button on it and then doing whatever you need to do on your phone to pair (lots of better instructions on how to do this on google).
Next you can test by getting a Bluetooth terminal program for your phone. I used Serial Bluetooth Terminal for Android, but you can use any program that sends serial data out the Bluetooth connection.
Sending SMS messages to the sign
To send incoming SMS messages to the sign from my Android, I used Tasker and Tasker Bluetooth Plugin which works amazingly well and can let you send pretty much anything you can imagine to the sign based off of apps running on the phone.
Write your own no-code app to control the sign
You can also very easily write your own phone apps to drive this sign with MIT’s App Inventor. Use the SendText action of the “Bluetooth Client” component to send whatever text you want to the sign. It work great and it is amazing how easy it is to make an app like this!
Driving the display from a computer
You can plug the Arduino into the USB port of almost any computer (Windows, OSX, Raspberry Pi) and it will appear as a serial port on that computer. Any text you send to that serial port will scroll onto the display.
Live typing
To make the display work like a giant typewriter, run an serial terminal program, set it to the correct serial port, and then set the speed to 9600 baud. Now start typing and it will instantly scroll onto the display! I used the free Kitty terminal program in the video.
Sending messages from a batch file/shell script/python program
You can easily send messages directly to the display from any batch file or shell script by just sending the text directly to the serial port that the UNO creates when it is plugged into the computer. You can then have the computer get data from websites and then put it on the screen, has it post messages whenever anything triggers an event on the computer.
Bitcoin Block Clock
To create the Bitcoin Block Clock in the video, I used the fact that the bitcoin-core program can be configured to call a batch file whenever something interesting happens. I had it call the following batch file to look up the height of the new block and send it to the display via the serial port…
echo bitcoin >com4
choice /D Y /T 1
echo block >com4
choice /D Y /T 2
echo height >com4
choice /D Y /T 2
D:\Documents\Programs\bitcoin\bitcoin-0.20.1\bin\bitcoin-cli.exe -datadir="D:\Documents\Programs\bitcoin\data" getblockcount >com4
choice /D Y /T 3
exit
This is for Windows, but you you are using Linux then you are enough of a geek to be able to figure out how to do the same thing with s BASH script on your own. Note that at some point after each boot you need to set the serial port baud rate suing something like mode com4:9600,n,8,1 (or stty -F /dev/ttyUSB0 9600 in Linux).
Note that you could do the same thing with walletnotify to have a message scroll anytime someone sends you some of that sweeet juicy crypto.
The tricky parts
The hardest part about this program is keeping up with the pixels. For old-skool WS2812B pixels you only have about 5 microseconds (us) between bits. If you wait any longer than that, the pixels will reset. It is hard enough to compute a new column of pixels every 5us, be we also have to be constantly checking and reading in any new data from the serial port. If we go too long without checking, some data will get lost and the display will get messed up. So how do we do all this?
- A tiny bit of assembly code. This code actually sends the most timing sensitive parts of the WS2812B signal, and writing in assembly makes sure we can control exactly how long everything will take. Don’t worry, this code is *very* simple with only two instructions. The
outinstruction sends a byte out to the pins and thenopinstruction just pauses for 62.5 nanoseconds. That’s it! Check it out here. - All interrupts off, all of the time. An interrupt literally interrupts the program and then goes and does something else for a bit and then goes back to what it was doing. This is normally very handy, but it is no good when you are trying to do timing sensitive stuff since when get interrupted, the code that was running gets stopped while the interrupt code runs. So for reliability and simplicity, here we just turn them off always and then never have to worry about them. The command that does ths is called
cli()which stands for “clear interrupt flag”. The two main things that normally generate interrupts are the timer and the serial port. We are careful to never use the timer (stuff likemillis()) because it will never update without interrupts. To get serial to work without interrupts, we need to use… - Polling mode serial receive. Polling means we keep obsessively checking to the if any new serial bytes have arrived. Normally a new byte would trigger an interrupt to read the new byte, but since we have no interrupts it is all on us to check. This seems wasteful and it does use up many more cycles than doing nothing until you get an interrupt, but with polling we get to pick *when* we check (and we pick moments when we have some free time) whereas with an interrupt it can happen almost any time. There is also additional overhead to calling an interrupt since it must remember what it was doing when the interrupt happened and then return back everything to the way it was afterwards.
FAQ
Q: How long can I make my ticker tape?!
A: The technical limit with the current 6 column wide font is [1000 characters in buffer] * [6 pixels per char] = 6,000 pixels. That’s 325 feet long with standard strips. In practice you will not want to make one this long because it will get too slow. It takes about 36 microseconds to transmit 1 pixel, so if you want to update at 20 steps per second (a brisk reading pace), that limits you to a maximum length of about 1,300 pixels, which is still about 75 feet long with standard 60 pixel/meter strips! If you need to go longer, it probably makes sense to put one or more additional Arduinos in the middle to speed things up. If you have a good reason to make such a humongous ticker then I’ll help you.
Q: Can I send text to the ticker from my phone over bluetooth!?
A: For sure! I picked 9600 baud as the default serial port speed because this is what the cheap (<$5 on Amazon!) and plentiful HC-05 bluetooth adapters run at out of the box. To use one, connect the HC-05 power pins to the 5V and GND pins on the Arduino and then connect the TX pin on the HC-05 to pin 0 on the Arduino. Next push the button to pair with your phone. Finally get a bluetooth serial app and start typing and it should end up on the tickertape!
Q: Can I send live info from the internet to my tickertape?
A: For sure! That’s the whole point! You just need to get the data you want and then send it as text out the serial port. With the Arduino attached to my windows computer via USB, I can make a batch file that send the text to the correct COM port (COM3 on my computer but you can check which on yours in the Arduino IDE) and prints it using a command like echo "This is the remix." >COM3. You can do similar things on a raspberry pi or OSX, check out the .
Q: How can I use this code on my [ANYTHING BUT AN ARDUINO UNO]?
A: Really the whole point of this project is that it uses an Uno. You can get it to run on some very closely related AVR-based Arduinos like the Micro and the Nano, but after that you should probably give up and find something meant for the board you have.
Q: Why is this better than just using a TEENSY?
A: The TEENSY is amazingly good at driving lots of pixels and if you have one and you know how to use it then you should use it! Otherwise, the UNO is nice for many people because (1) it is cheap and widely available around the world, (2) millions of people have experience with it, (3) it directly generates the 5V signals that all these pixels need so no buffers or converters are ever needed.
Q: Why does the bottom row of pixels go nuts when I download the sketch?
A: The Arduino digital pin 1 that we use to drive the bottom row of pixels also happens to be the UNO’s serial transmit pin. This is normally not a problem since our sketch never transmits anything, but when we download a new sketch the Arduino and the IDE do talk to each other over the serial port and this data is what makes the LEDs go nuts.
Q: Why do I see all kinds of garbage in serial monitor while I have it up?
A: We are using the RX pin (Pin 1) on the Arduino to drive a row of pixels, but the computer is also connected to the pin so it sees the WS2812B signals as very garbled serial data. It is OK no one will get hurt.
Q: My text is there but looks all janky. What gives?
A: The pixels can get messed up easy – especially WS2813 pixels and especially when the Arduino resets after a download since it turns off the pins connected to the pixels. The best thing to do is press and hold the reset button on the Arduino, turn off power to the pixels for maybe 10 seconds and then turn it back on, and finally release the reset button. This helps make sure the pixels don’t get confused by seeing noise from the the Arduino pins before they have turned on.
Q: Can I make it scroll in the opposite direction?
A: It is significantly harder since you have to send the data in order to the pixel strings, so you would have to compute ahead of time where to start sending. Not that much harder, but the current direction is easier and avoids needing a buffer.
Q: Is it possible to change the color of the text in real time – like even individual words?
A: Yes, I had a whole system where you could stick a #RRGGBB anywhere in the text to set the color. Unfortunately it was just a smidge too slow for some of the older, finicker pixels around. Worked great with all WS2813 pixel though since these have much longer timeouts. If you have the new pixels and really need this and can’t figure out how to do it yourself, LMK and I’ll give you some code.
Q: Can I pay you to build one for my yacht club’s big race event this Sunday?
A: the whole point of this project is to build it rather than buy it! I bet there is some bored 13 year old kid in your town who would love to build this for you if you buy all the parts for him.
Q: What if I only have 5 strings of pixels?
A: Check out this tiny little whiff of a font. Paste it into the Arduino sketch where indicated. Connect the strings to pins 2-6.
Q: I really want to be able to have bidirectional serial communication with my Arduino while it is scrolling.
A: You can do it! Use the above little font above to free up the Arduino’s TX pin, then use this command…#define SERIAL_TX(c) do {while (!(UCSR0A&(1<<UDRE0))); SERIAL_TX_BLIND(c);} while (0)
…to write a char out the serial port.
Q: Can I change the baud rate of the serial port?
A: Yes, you can use any valid baud rate in the Serial.begin() line in the setup() function. Do not pick a baud rate that is too fast or you will start losing serial bytes, but really there is no reason to go any faster because 9600bd is much faster than anyone can read anyway. Slower is nice – set the baud rate to a speed you can comfortably read if you want to make sure the buffer never overflows.
Q: Can I edit the font or make my own font?
A: Yes! The font is defined where it says fontData and is designed to be very easy to edit directly in the program. You’ll see one section for each letter in the font, and then inside each letter there is one line like 0b00110000 for each column in that letter. If you look at them sideways and squint you should be able to see the letters pointing downwards. Here is the letter E, see it?…
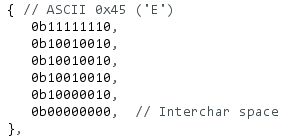
Note that every letter must have the same number of columns, and that number is defined as FONT_WIDTH in the program. You should also leave the rightmost row as 0‘s if you are going to use the serial port since this bottom row of pixels would be connected to the same pin and the serial port. Please share any nice new fonts you make in the comments below!
There are also several nice fonts in the fonts directory that you can directly copy and paste into your program. Note that it is easier to copy them if you push the “raw” button on the github page for each font and then do “select all” + “copy” from your browser.
Q: Can I make my font 8 rows tall rather than 7 like all of yours?
A: Yes, but then you will need to use digital pin 0, which also happens to be the serial receive pin, so you will need to disable the serial port from using that pin by commenting out the Serial.begin() lin in the setup() function. Note that with no serial port, you will need to either generate all your text locally on the Arduino, or use a different kind or port like I2C or SPI to get your text into the Arduino.
Q: Can I make my font even taller than 8 rows?
A: Yes, you could in theory use all of the pins to drive LED strings and make a very tall font, but that would mean more complication. If you can live with just, say, 12 rows of pixels then everything works kind of nicely since digital pins 1-13 are all in a nice row on the side of the Arduino. If you really need to do this LMK and I’ll give some code.
Q: Why use an Uno? This would be so much easier with a TEENSY or something like that.
A: The Uno is cheap, well-known, and easily available almost everywhere. It is a scientifically proven fact that every person on Earth has at least three UNOs in a drawer somewhere.
Q: Where is the video of the giant Angry Birds game?!?
A: I want to see it again too! It was glorious! Sadly I’ve lost the link. If you’ve seen this project anywhere please LMK!
Q: How do I get interactive backspace to work like in the video?
A: Replace the appendToBuffer() function with this one…
void inline appendToBuffer( const byte b ) {

  if (b=='\b') {  // backspace
    if (buffer_len) {
      buffer_len--;
    }
  } else  if ( buffer_len < BUFFER_SIZE ) {
    buffer[ buffer_len++ ] = b;
  }

}
Q: Should I use WS2812B, WS2813, or SK6812 pixels?
A: WS2812B are the originals so are usually the cheapest and easiest to get, and have a wide selection of different form factors. WS2813 and SK6812 are newer versions that have a longer reset time, which gives you more time to do work on the Arduino between transmitting pixels. If you are going to use my code unchanged then it doesn’t really matter, but if you want to experiment with adding new features like changing color in the middle of a message or being able to make letters blink, then the WS2813 will make that much easier. (There are other differences that do not really matter for this project)
Q: Should I use 5V or 12V pixels?
A: The 5V pixels are more common and easier and usually cheaper to get. If you want to make a really long display, then the 12V pixels can better better since there is less voltage drop for a given length, so you can have longer connects to the power supply and use potentially thinner wires. 12V is also handy if you are going to be powering from a car or a car battery.
Q: Would it be possible to use a variable width font?
A: Yes. Probably the easiest way would be put leading zeros in the font data at the beginning of any characters that are narrower than the font width, and then skip any leading zeros when sending columns to the pixels. The timing would be very tight on older WS2812B pixels, but no problem on newer pixels with longer reset times.
Q: Can I power the Arduino from the same power supply I use for the pixel strips?
A: Yes. If you have a 5V power supply then you can connect the “+” side directly to the “5V” pin and the “ground” side to any of the “GND” pins of the Arduino. If you are using a 12V power supply, then you can connect that to the barrel jack on the Arduino. If you don’t have a barrel connector, then you can also connect the +12V to the “vin” pin and the “ground” side to any of the “GND” pins on the Arduino.
Q: How do I make it scroll vertically like in the Block Clock demo?
A: Check out https://github.com/bigjosh/SimpleTickerTape/tree/main/VerticalTickertape.
Q: How can I make it keep scrolling a message over and over in a loop? (added 2022-10-12)
A: Check out the Looping message demo here. There are many ways you might want this to work, but here I’ve chosen the one most like the simple demo in operation. Like the simple demo, it will scroll out any bytes that come in from the serial port and then wait for more to come in. The difference is that you can now send a LF (line feed = '\n' or 0x0a) or a CR ( carriage return= ‘\r’ or 0x0d) and this display will enter “loop” mode where it will start cycling in everything that was received since the last LF or CR (or since power up). That will continue until a new byte is received, at which point it will start scrolling of the bytes again until another LF or CR is received. Sounds more complicated than it is – try it out and you’ll see how it works. You can use the “Send Line Feed” and “Send No Line Ending” settings from the pulldown in the Arduino serial monitor, or just press enter to start looping if you are using a terminal program.
Note that (for complicated reasons) that if you make a looping message that is shorter than the display, then when you switch back to non-loop mode again there will be a jump. If you don’t like this, then pad any short messages you have with spaces at the end to make them longer than the display.
Note also that this code needs to keep the most recent looped message PLUS enough bytes from the pervious message in the buffer to allow it to make a seamless scrolling transition. I could also imagine applications where it would be better to just abort out the current message as soon as a new one started coming in to save memory and also not make viewers wait for the old message to finish before seeing the new one. I could also imagine having each message start and end with with space padding so it is very clear when each message begins and ends. If you want either of these, take a look at the code and see if you can figure out how you would do it!
Q: Can I use an Arduino MEGA? (Added 12/9/2022)
A: Yes. connecting the pixel strings to pins D54-D61 and, (2) changing the code so “PIXEL_PORT” becomes “PORTF” and “PIXEL_DDR” becomes “DDRF”. You will also be able to use all 8 strings with no complications from the serial port, so feel free to make the font 8 rows tall and do bi-directional serial communications.
would this zigzag code work to achieve taller fonts ? Thanks
#include //https://github.com/FastLED/FastLED
#include //https://github.com/Jorgen-VikingGod/LEDMatrix
// Change the next defines to match your matrix type and size
#define DATA_PIN 14
#define COLOR_ORDER GRB
#define CHIPSET WS2812B
// initial matrix layout (to get led strip index by x/y)
#define MATRIX_WIDTH 11
#define MATRIX_HEIGHT 11
#define MATRIX_TYPE HORIZONTAL_ZIGZAG_MATRIX
#define MATRIX_SIZE (MATRIX_WIDTH*MATRIX_HEIGHT)
#define NUMPIXELS MATRIX_SIZE
// create our matrix based on matrix definition
cLEDMatrix leds;
Great project by the way
FastLED is completely different than the code in this article, and they are not compatible at all. FastLED is great, but has the limitations that (1) it can only drive one string of LEDs at a time, and (2) it stores all of data for the pixels in a memory buffer. The code in this article (1) can drive 8 (up to at least 16) LED strings all at the same time, and (2) generates the pixel data on the fly as it is being sent, so you can have much larger displays than would fit in memory.
To drive 11 strings at the same time with the above code, you would need to (1) make/find a font that has 11 rows of pixels, and (2) change the code to send data to a second set of IO pins (likely digital pins 8-13 since they are physically next in line on the UNO).
Do you have an application that needs a font that is 11 pixel high? Do you have a font to use? Do you have enough strings to build it?
I have found a font below that I have pasted into the simpleticker which seems to work NB Typeing each letter brings up the lower 6 pixels of what looks like a 10 high font, I got the font from this similar project…
I have a 180×16 ws2812b matrix (60leds/mtr) and have a mega2560 and uno if that helps any ?
That is a cool project that I had never seen before! I really like his code that sends the signal to the pixels without any assembly language at all.
If your matrix is only 180×16 then you do not need my code – that is small enough that it can fit in memory so can use any of the normal stuff like FastLED or the Adafruit stuff.
Yes interesting thought but just keeping my options open re SimpleTicker how would I drive the 10 pixel high font over ports D and B pins 1-10 ?
on line 845 I have added…
#define PIXEL_PORT PORTB
#define PIXEL_DDR DDRB
do I need to change anything else ?
thanks
It will take more than that. To drive more than 8 strings at a time, you need to send pixel data to both PORTB and PORTD at the same time, and you need to have font data formatted for the height. If you can supply a suitable font and have a 10 string high display to test on then I can show you how.
hi JOSH, i have made your previous work which is similar output to this… i really like the way you code… this one and the older version was GREAT !!! very nice… , not memory hungry… thanks for posting and the tutorial…
What did you use it for? Share pictures, we want to see how it turned out! :)
Hi Josh,
Thank you for this updated code. It loads and runs. I wonder if it is supposed to stop at the end of your josh.com line? It scrolls over until it reaches the end of it. When I try with the serial interface it does the same with whatever I enter into it. It just ends at the end of the line. I did choose no line ending and 9600 baud. The monitor shows it is sending it as though it should be scrolling. But the sign doesn’t scroll.
Are you using the `SimpleTickertape.ino’ sketch? Does is it compile and download the Arduino without errors? If so, then you should be able to type a message into the Serial Monitor and press enter, and then it should scroll on the LEDs!
Yes. I am using the SimpleTickertape.ino sketch. It compiled and upoaded without errors to the Arduino. I did try the serial monitor and it scrolled until the end of the entered line and stopped. Same with the sample text added in memory. I can’t see any reason why the text would stop scrolling once it reached the end of the line. I did select no line ending and 9600 baud in the serial monitor. It still ends at the end of the line.
So the expected behavior with the current code is read any text that comes in off the serial port and scroll it onto the LEDs. If there is not more data coming in from the serial port, then it will stop scrolling and continue to display whatever is still on the display. If you want the last thing the scroll off of the display and leave it empty until the next text comes in, then you can just add a bunch of spaces to the end of each message.
Oh ok. Then it is working as expected. I thought it was going to scroll the same text over and over until I change it. That is what I need it to do.
You can easily change the code to have it scroll the most recent message repeatedly. Maybe have a newline signal the start of a new message depending on how you want it to work.
I am thinking a loop. If new text is coming in then play it, if not go back to start scroll the text again. The issue I am trying to suss out now is I have 2 strips that refuse to work. Current runs through them but they won’t light up. It’s odd because I cut them apart from two 5 meter LED strips. Their counterparts light up so I see no reason why these two won’t work. If I have to replace them I do have a couple more 5m strips coming. But I don’t get why they won’t work and I’m not sure if replacing them will solve the issue or not.
Josh, thank you for all your help and patience.
Test best way to test strips to see if they are broken is to connect them to a power supply and follow the adafruit strandtest instructions.
I also want to mention that the Bluetooth device does not work with IOS. It did pair with my MacBook, but it won’t work with my iPhone or iPad.
If you need a board for IOS then the HM-10 will work.
Wow, you’re right! That sucks! Apparently the At-09 does work with i-stuff…
View at Medium.com
Check out the FAQ question “Q: How can I use this code on my [ANYTHING BUT AN ARDUINO UNO]?“!
Hi Josh. Would is be easy enough to create this project with an ESP32 instead of an Arduino? The reason I ask is that the ESP32 already has Bluetooth and WiFi, and i would like to be able to display the Date and Time.
Can you load a continuously scrolling message into the code? I’m making one of these to show on-call phone numbers for my hospital nurse’s station, and I’d love for messages to continuously scroll.
This is easy to do, you just need to decide how you will update the display. One way would be to have each message end with a line feed. The ticker would then cycle though the chars in the buffer between the last received char and that line feed. When it gets to the linefeed then it goes back to the most recently received char. Make sense?
I just added an FAQ about looping messages…
Hi Josh. Great Project!
I have a bit of a weird issue. Followed your directions and built a ticker ~8 feet long. SimpleTickertape.ino loads and all of the strips work. The issue is that all of the letters are backwards. It’s like I am looking at them from behind. Also the message flows towards the Arduino
This is not a tech question, it is a geometry question!
There are several changes you can make to fix the inversion you currently have. Probably the easiest is just to turn each LED tape so it is pointing down towards the table it is sitting on, and then take the whole setup (LEDs + Arduino) and flip that over. See?
With the current version of the code, the messages do flow towards the Arduino. This is not hard to change in the code, but physical flipping is probable quicker than code edit.
Report back with results and video. :)
Josh, so close is your latest post to a project I’m ready to build. Similar to Afik’s totem project – I’d like to build a similar LED display on a pole that I can run off batteries and take to my daughter’s volleyball games for running a real time score display. I’d need to change the point count for either side, switch to a timeout countdown clock, have the score switch the sides with the teams and it would be cool to switch to a regular clock or scroll the team name, slogan at off times. How would you recommend I drive this (via Phone/Tablet BT?) as I have to stand and hold everything, dodge occasional crazy shots. Can you speak more to the app options I could use to handhold and control the panel?
You get to pick how you want to do it! The simplest might be just a bunch of buttons for the above functions, which each button connected to an input pin on the Arduino. Or you could use BLE and make a full blown app to run on a phone. In that case, Google App Creator is an easy way to make simple apps and it can talk to BLE.
So many great fonts here…
https://github.com/robhagemans/hoard-of-bitfonts
Would love to see the code for the system for changing the color of a specific word that you mention if possible thanks!
Hi josh! Such a cool project. I’m working on a prototype small version (only about 15inches long) and hoping to make it 11feet long after I get everything working :p It will be included in an exhibit I am working on at a museum!
i ran into quite a few problems as a newbie to arduino. I could not get the LEDs to work for the life of me – had to ask a friend to come double check my work and it turns out there is a right and a wrong side! I had my power on the wrong side. Oops.
Now I’m trying to make it scroll the same message over and over, forever. I’ve managed to get the code to repeat the same message, but it ends after about 3 minutes. Wondering if you could point me in a direction? In a previous comment you said ..
“Maybe have a newline signal the start of a new message”
and
“One way would be to have each message end with a line feed.”
I’m wondering if you could help me understand and apply it to myself. I will drop the code section that I edited.
void loop() {
// Delay so text does not scroll to quickly…
// Remeber we can not use millis() here since interrupts are permenetly off
// We also have to manually keep checking the serial RX so that it doe snot overflow
for( unsigned i=0;i < FRAME_DELAY_MS ; i++ ) {
_delay_us(900); // Pool just often enough that we do not miss any serial bytes at 9600bd (1 byte about 1ms)
serialPollRX();
appendStringToBuffer ( " THIS IS THE TEXT I WANT REPEATED " ) ;
}
let me know!
I just added an FAQ about looping messages…
Hey Josh,
I am currently working on building this for a fantasy football draft for our league next year. I am having trouble trying to figure out how to loop the text on the strip.
The goal is for it to continuously show each draft pick so we would display pick 1 for example, Jonathan Taylor. Then for pick 2 we would want to show Jonathan Taylor followed by Dalvin Cook for instance.
Is that something that is able to be done with this setup?
Thanks!
I just added an FAQ about looping messages…
Would this still look right with strips that are 100 led per meter or would I need to adjust the font since it wouldnt be divisible evenly by 6?
It might look a little squished, but if it does then you can always make the font wider.
Thanks for the awesome project! I completed it this weekend using 7×144 ws2813b strips and it works great! I even upped the baud rate to 19200 to get even better input. I only wished I could see what I was typing in the terminal. All the noise going past the screen makes it impossible to see what you are typing. Thanks again for the great code and tips!
Post some photos or a video of your project to inspire others!
Hi Larry, sorry for resurrecting this old comment, but I was wondering if you were able to run the 7 x 144 pixel strips while still using the Arduino Uno or if you had to use a Mega or other? Thanks in advance if you happen to receive this and thanks Big Josh for all the info
7×144 no problem for an UNO! You can do 7×10,000 on UNO no problem. It is when you want to go more than 7 is when you want more pins, and even then moving to a mega doesn’t really change things.
I totally forgot to post a link to my finished project!
Hello
Thank you for the great description and documentation of the Project. I built it now two Times. Once i built it with LED Stripes, the Second version is with a PCB an the WS2812B soldered on. I still have a question, how it is Possibile to run more than 8 Lines? I tried to change the Arduino Bord Data that PORTD includes more than 8 Pins but it didnt work.
Here two Images of the PCB version: https://imgur.com/a/xsTuhMZ
Lovely board! There are several ways to drive more pins, but to be honest this is just not that many pixels so why not just connect the extra row to the end of one of the used rows? Or to any other IO pin and then drive that extra pin separately with normal WS2812B single string code? All this parallel bit stuff is really only necessary for long displays. Make sense?
Hello
Thanks for the Answer and Explanation (makes Sense). I will try to use in this Project something like the NeoMatrix Library. (https://learn.adafruit.com/adafruit-neopixel-uberguide/neomatrix-library)
But if i have a Longer LED Panel can i define a own Data Register with my own Pins and a bigger Pin Amount than 8 or do i have to edith the sendBitx8() function that it first sends to the first 8 and afterwards to the oder 8?
Does a Code with more than 8 Pixels already exist?
If you only need 8 rows and the Arduino board you are using has a GPIO register with all 8 pins available (Uno does not, except for PORTD which is the one I used in this program – but it shares the bottom bits with the serial port), then you could just change this code to use that register and then use those pins. Otherwise you can spread the pins across two GOPI registers and either (1) update each one sequentially, which is simple, but takes twice as long to update the display, or (2) update them both at the same time which requires some very careful coding to get the timing right. I have gotten this to work, but it is tricky. You also need a font that has the number of rows you are using.
Is it possible to have the display an rss feed like this one?
https://www.espn.com/espn/rss/nfl/news
Yes! You just need to find or write a program to read the RSS feed and spit it out the serial port.
Here is one that runs on a Windows PC…
https://github.com/kevincon/8x8led/tree/master/python
…but should be straightforward to change it to work on something like a raspberrypi.
Hey Josh,
I love the display. I just got done building one for my college dorm, but I am having a similar problem as others getting the display to continually scroll the most recent message. I am very new to C++ and I am still learning, so I was hoping you might be able to elaborate (maybe give examples) for the coding on some of your past statements on the topic, such as using a linefeed. I tried appendStringToBuffer a message within the loop, but I believe it runs into buffer problems/lack of updating after ~5 min. Thank you for any help you can give, and I have loved tinkering around with this project!
I’ll try to code up an example program soon.
I just added an FAQ about looping messages…
Hey Josh, thanks for this cool build. I am having a problem with configuring Tasker to send SMS messages to the bluetooth serial port. Could you explain in a bit more detail how to do this, I can’t seem to find anything on the internet and I would be very thankful for an explanation.
Check out the Bluetooth Serial plug-in for Tasker…
https://play.google.com/store/apps/details?id=com.giechaskiel.ilias.bluetoothserialfromtasker&hl=en_US&gl=US
Once this is installed, you can make an action that runs whenever an SMS is received and sends the message out to the paired bluetooth module on the Arduino.
Report back if any questions – or if you succeed!