Inductive power on the cheap – Philips Imageo Tea Light Teardown
How can Philips sell a set of 6 inductively rechargeable LED lamps with charger and glass holders for less than $80 retail? It takes some careful and clever value engineering. Let’s crack one open and see if we can figure out what tricks and techniques they used!

The housing has just 3 straight pull injection molded parts:
- opaque base plate
- opaque top
- translucent “flame”

The base plate has ribs for holding everything in place. There are no screws anywhere. The guts can just drop in and then the top is probably spin or ultrasonically welded on. Super fast and simple assembly, and the finished unit is sealed with no way for water to get in.

Inside we find…
- Inductive receiving coil. No expensive Litz wire or ferrite field concentrators here. Just enameled wire with some shellac to hold it together after it is removed from the form.
- Two through-hole amber LEDs. These are crazy cheap. The LED leads are bent over to position the light up inside the “flame” protrusion without requiring any wires, connectors, or daughter boards.
- Two 300mAh, 1.2 volt Nickel–metal hydride batteries. These are cheaper and easier to charge than Lithium Ion. By using two in series they get 2.4 volts nominal output which is perfect for driving the LEDs without a voltage converter.
- Circuit board. And what a fine circuit board it is!

The board is single sided FR-4 with punched holes. I love boards like this. They take more work to design, but the effort can be worth it for low cost, high volume products . My guess is that you could make this little gem for less than $0.10 in the USA and even cheaper in China.

On the front of the board, notice that the copper is only etched enough to isolate the traces from each other. The less copper you etch, the longer your etchant will last. It matters when you are etching millions of boards. I wish more design tools supported isolation routing like this rather than typical fixed width traces.
There is a white silk screen pattern around the off-board LED solder connections. This probably makes it easier to inspect for solder bridges. Clever!

There is more functional silk screen under 3 of the pads on the MCU…

I think the screen here serves as an additional layer of resist and/or to help make it easier to inspect for bridging.
But why not just put unconnected pads under these pins? Routing a single sided board can be hard and sometimes you need every path you can get. There are traces running under these unused pins that probably couldn’t have gone any other way. Why not just run those traces between the unused pads? That would require a smaller minimum clearance, which would require a much more expensive fab process. This is a better solution.

The fact that there are unused pins on the MCU suggests that this is an off-the-shelf component and not a custom chip. It is marked “U-tek P38970”. I’ve never heard of U-Tek, but my guess is that that is a general purpose MCU similar to a AVR or PIC. If you know anything about U-Tek or this chip please let me know in the comments!

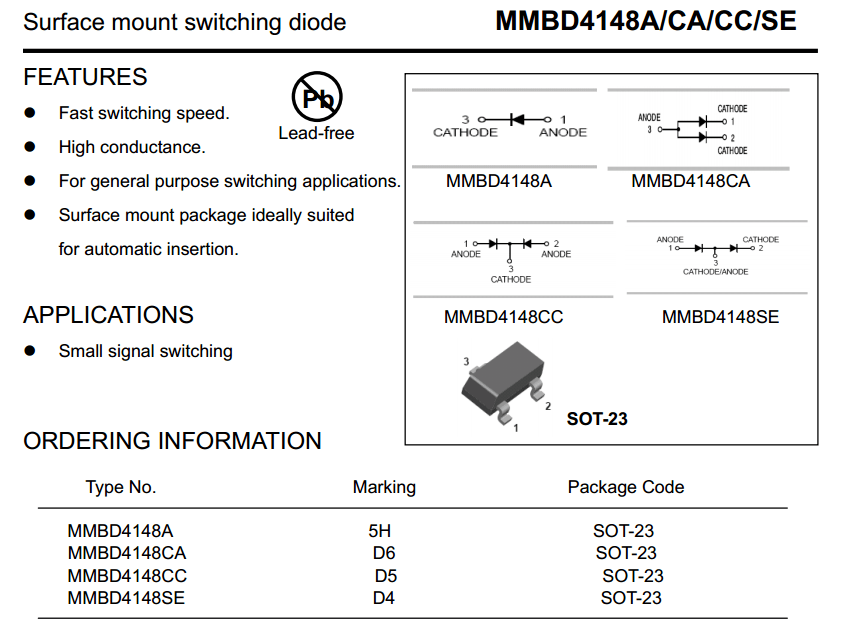
These little SOT23’s contain dual switching diodes, which saves 2 parts compared to using individual diodes in this full rectifier.
Finally, we move on to the only part on the back side of the board – a through-hole tilt switch…

This is the only moving part and the only sensor in the unit. The user turns the candle on and off by turning the candle upside down. This causes a little ball in that tube to roll and either make or break contact between the leads.
A button would have required much tighter tolerances, and would have also made it tougher to keep the case water tight. These are super cheap and probably more reliable than a button and a great choice for this application.
The only disappointment I have in this otherwise lovely board is that it uses 56 ohm resistors to limit current though the LEDs…

These could probably be eliminated by using PWM. This would…
- reduce the the parts count by 2, because every resistor matters.
- reduce power usage by about 2mA. This could potentially let the candles run a little longer on a charge.
- allow smooth dimming of the LEDs for a more natural flicker.
Next time we’ll dig into the circuit design!
Nice breakdown & thank you!
Anything to say about the charger?
Cheers!
Stay tuned for receiver and charger circuit analysis!
Yes, please! :-)
It’s Tea Light, not Teat Light.
Fixed. Thanks!
Yes, but it looks like a Teat light.
Can you really use *only* PWM for LEDs? I think that wouldn’t work in practice because of the non-linearity of LEDs’ conductance. Or to put it another way, the resistor doesn’t just limit the current, it makes the operating point of the LED stable. PWM wouldn’t do that.
Full article on the heretical joy and non-necessity of LED current limiting resistors coming! In the meantime, check out VIBE and Ognite for examples of products that don’t have resistors and don’t blow up.
Many thanks for the review of the Philips Imageo Tea Light Teardown, you helped me a lot.
Hi josh, found your article looking for info on hard to start imageo’s. Very interested in the next part!
Great article! I learnt a lot about these candles.
Any specific information about the batteries? I’m thinking of changing them cause mines almost last no more than a couple of hours.
They are cheap NiCads. If you wanted super long runtime and were willing to spend a bit of time and money, it would not be too hard to replace these batteries with LiPos with much more capacity. You would also need a LiPo charger controller, but these are cheap, small, and easy.
Hi! wondering if you got time to post schematic for the candle and for the charger. Take a look at something similar I teardown – https://www.youtube.com/watch?v=f1yacWXcrc0 I suspect schematic will be similar. Thank you
Sorry, there did not seem to be much interest in this project so I never followed up with the rest of the article.
What can cause it to malfunction sooner than expected?
Very interesting post, particularly that you point out the value engineering tricks being used, rather than just a simple teardown showing random parts.
How did you remove the light from the glass holder. My early ones pinged out with some side pressure but the later ones are bonded in with a flexible (silicone?) adhesive which just stretches and holds tight.
Managed to finally get it out by putting a flat bladed screwdriver in each of the two slots at the top, gripping these tight and then twisting the glass container until the silicone sheared.
I produced a schematic of this while doing a battery replacement.
https://www.dropbox.com/s/k9wd7jxi303rpwr/PhilipsCandleCircuit.png?dl=0
I wanted to understand the power circuit. The interesting part is the bistable flip flop made up from the pnp / npn transistors. If the pnp transistor is on then it turns the npn transistor on which in turn keeps the pnp transistor on. Likewise if the pnp is off then the npn stays off. Power is only supplied to the ic controller from the pnp transistor when it is on.
If one replaces the batteries then the bistable is off and tilting the switch will not turn anything on. However, there is a feed from the induction coil through the diode to the base of npn transistor so if the unit is placed into the charger then the bistable will turn on and stay on even when it is removed.
The bias for the bistable is also arranged so that if the battery volts drops below about 2.1V then it will turn off. The purpose of this is to stop the battery running right down. The circuit will automatically turn back on when the battery is charged up AND it is in the charging unit.
I was replacing some batteries and didn’t have immediate access to a charging unit so after replacing the batteries I simulated the turn on mechanism by touching a 4.7K resistor between battery + and the npn base. This triggered the bistable on and it then stayed on.
Lovely circuit, and lovely work!
Where can i buy the replacements batteries?
In UK
https://www.batteriesplus.co.uk/acatalog/1_3_AAA_Size_NiMH_Tagged_Battery.html
In my version there are two 600 mAh 1.2 V 2/3 AA NiMh batteries.
Great article thanks. Wish I was smart enough to have analysed the circuit operation like that.
I stripped three units that had stopped working, and the results are quite interesting:
One was a straightforward zero-volts battery (so the unit only charged to 1.3v) which was fixed by stealing one from one of the other dead units.
Two had died due to leakage of electrolyte from a battery, which had migrated along the connecting wires and onto the pcb’s, with destructive effect. I noted that even one or two of the batteries that were working were beginning to show signs of leakage, so if you get that far, may be worth coating the ends with sealant.