


It is possible to generate one-shot pulses on an AVR that…
- Are as narrow as a single clock cycle (63 nanoseconds!)
- Are precise to a single clock cycle
- Will run to correct completion no matter what else the processor is doing 1
- Do not require you to turn off interrupts at all (!)
- Do not require any assembly code
These pulses are generated in pure hardware. They require a couple of instructions of interruptible code to fire. Once fired, they are completely autonomous and depend only on the system clock to run to completion.
Sound cool? Read on!
Update 11/22/2019
The new AVR0 chips have a built-in and well documented single shot mode!

Demo
Here is a handy demo program…
https://github.com/bigjosh/TimerShot/blob/master/TimerShot.ino
This demo is written for an Arduino to make it easy to try, but this technique can work on any AVR8 with a timer module.
Download and run the demo and your Ardunio will start outputting one pulse per second on digital pin 3.
The 1st pulse is 0 cycles long (no pulse),
The 2nd pulse is 1 cycle long (~63ns),
The 3rd pulse is 2 cycles long (~126ns),
…up to a total of 20 pulses, and then will start over.
The output should look like the above animated GIF. The yellow trace is the pulse.
Note that there is no cli() or ATOMIC() anywhere in the code. Interrupts are on the whole time, yet you will never see a stretched pulse because an interrupt happened to come along at just the wrong time. You will also never see jitter because the firing was delayed.
It is like magic!
Usage
TLDR;
To make a pulse, call…
OSP_SET_WIDTH(cycles);
…where cycles is the number of clock cycles wide you want the pulse to be. For example…
OSP_SET_WIDTH( 1000 );
…will output a pulse that is 1000 cycles wide.
More options
Here are the functions and macros you can use to add precise one-shot pulses in your own code…
osp_setup()
osp_setup(cycles)
Setup the timer to generate one-shot signals. Must be called before any of the other functions. Can be called multiple times. You can optionally specify the width of subsequent shots in cycles.
OSP_SET_WIDTH(cycles)
Set the width of any subsequent shots to the specified number of cycles.
OSP_FIRE()
Fire off a shot using the most recently set width.
OSP_SET_AND_FIRE(cycles)
Set the width for this and any subsequent shots to cycles, and then fire a shot. Slightly faster than calling OSP_SET_WIDTH() followed by OSP_FIRE().
OSP_INPROGESS()
Returns true if there is currently a shot in progress.
Width
At any moment, there is a width set and the next shot fired will have that width. Firing a shot does not change the current width setting.
- You can set the each time you fire a shot using
OSP_SET_AND_FIRE(). - If you are going to be firing several shots of the same width in a row, it is slightly faster to set the width with
OSP_SET_WIDTH()once and then callOSP_FIRE()for each shot. - If you know the width of the first shot (and possibly subsequent shots), it is slightly faster to specify the initial width when calling
osp_setup()and then callOSP_FIRE().
Testing for a pulse in progress
You can check if there is currently a pulse being generated with OSP_INPROGRESS(). If it returns 0, then the most recently fired shot has completed. Because of the overhead of executing the OSP_INPROGRESS() macro and code that uses the result, there will always be a few cycles of downtime between fires.
Because they run independently, the end of a one shot can occur while the CPU is in the middle of an instruction. This can cause some jitter when testing for the end of pulses, but you will never have to worry about erroneously seeing the pulse finished while it is still in progress. Check out the animated GIF above to get a feel for how the end-of-pulse test interacts with different pulse lengths (the blue trace goes low when the code detects and acts on OSP_INPROGRESS() going low).
Computing cycles
You can use the F_CPU macro to figure out how many cycles at the defined clock speed. F_CPU is defined by the compiler to be the number of cycles per second, so you could use…
OSP_SET_AND_FIRE( F_CPU / 1000000 );
…to generate a 1us pulse (1us =1/1000000 of a second).
Note that F_CPU assumes you are using a normal clock setup. if you are messing with fuses or otherwise changing the cpu clock settings, then you’ll have to figure out what your new F_CPU should be and redefine it in your code.
Examples
[code lang=C]
osp_setup(1);
OSP_FIRE();
[/code]
Fires a single shot that is 1 cycle long (about 63ns with a 16MHz clock). Note that you do not need to test if a 1 cycle shot completed because just executing the code to check would take many cycles.

[code lang=C]
osp_setup();
OSP_SET_AND_FIRE(10);
while (OSP_INPROGRESS());
OSP_SET_AND_FIRE(20);
while (OSP_INPROGRESS());
OSP_SET_AND_FIRE(30);
[/code]
Fires three shots, of width 10, 20, and 30 cycles each respectively. There will be at least 1 cycle of space between the two shots (in practice it will be at least 10 cycles because that is how long it takes the CPU to evaluate and exit the while.

[code lang=C]
osp_setup();
for (uint8_t i = 1; i < 10; i++) {
OSP_SET_WIDTH(i);
for (uint8_t j=0; j<=i; j++) {
OSP_FIRE();
while (OSP_INPROGRESS());
}
}
[/code]
Fires 1 shot that is 1 cycle long, then 2 shots that are each 2 cycles long, then 3 shots that are each 3 cycles long, and so on up to 10 shots that are each 10 cycles long. There will be at least 1 cycle of space between all the shots.

FAQ
Why not just use a tight loop to bit bang the pulse out?
- You would need to turn off interrupts for the length of the pulse, or risk being interrupted in the middle of a pulse and stretching it unpredictably. Turning interrupts off for the full duration of the pulse could disrupt any interrupt dependent tasks that might need to run. With this one shot technique, firing a shot happens within a single atomic instruction, so you never need to turn off interrupts.
- You are just burning cycles the whole time you are locked in that delay loop. With this technique, once the shot is fired, the processor is free to go off and do whatever it likes. The shot will continue to run in the hardware and end at exactly the right time no matter what code the processor happens to be executing at that time.
- The shortest pulse you can generate with bit banging is 2 cycles.2 With this one-shot technique you can reliably generate a pulse as short as exactly 1 cycle.
- There is no reliable 3 way to do calculated timing loops finer than microseconds in C, so you have to drop to assembly.
- There is no clean and efficient4 way to generate cycle-denominated loops in assembly.
What is the longest pulse you can generate with this technique?
The code here can generate a pulse up to 254 cycles wide, which is about 16 microseconds on at 16Mhz Arduino.
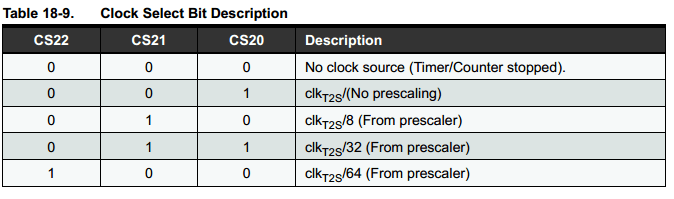
If you need a longer timeout, you can increase the prescaler in Clock Source bits in the TCCR2B register.
Changing the line
[code lang=text]
TCCR2B = _BV(WGM22)| _BV(CS20);
[/code]
to
[code lang=text]
TCCR2B = _BV(WGM22) | _BV(CS22)|_BV(CS21)|_BV(CS20);
[/code]
will change the prescaler to 64, which means that each cycle of the timer will take 64 clock cycles. So, OSP_SET_WIDTH_AND_FIRE(1) will generate a pulse that is about 1 microsecond wide and OSP_SET_WIDTH_AND_FIRE(254) will generate a pulse about 1 millisecond wide.
If you want any longer, you could use the 16 bit Timer1 (the code here uses Timer2 which is only 8 bits). That could give you a pulse width range of about 0-4 seconds, in 64 microsecond steps. Keep in mind that these 4 second long pulses are still actuate to a single clock tick (~62.5ns). Pretty impressive! One complication is that access to the 16 bit counter is not atomic, so you would need to either (1) disable interrupts for about 200ns to fire the shot, or (2) stop the timer, set the counter, and then restart the timer to fire the shot. Maybe I’ll do a full article on this is people want it. UPDATE 10/25/21: Dan correctly points out that these 16-bit timer registers can be accessed automically, making things much easier!
Wait! How the heck does this actually work? I thought the AVR timers were free running!
Stay tuned next week for a full explanation!
- The clock feeding the timer clock much still be running, so you can’t shutdown and you can’t change the clock speed or you’ll mess up the timer. ↩
- …or at least the fastest I can figure is a
sbifollowed by acbi, each of which takes 2 cycles. Is there a faster way I don’t know about? ↩ - You could try the _delay_cycles() built-in, but it is not universally supported (doesn’t work on the OSX version of the Arduino IDE, for example). No matter what, you can never be sure that your code won’t get re-ordered on you and mess up your carefully computed timing. ↩
- There are some complicated tricks to insert some combination of macros based on bits, but these are definitely not clean. You can use the REPT macro to insert a straight series of NOPs, but this is not memory efficient. ↩